This page shows the information to create a game with GWT. I'll explain GWT with my sample and its programs.
I'll show my sample first. I created it with GWT. You should make Java Script available, or it doesn't work. It reacts if you push arrow key or click or double-click. If it doesn't react, you should click on it. I'll show its programs at the end.
How to install GWT to eclipse
I'll explain how to install GWT to eclipse.
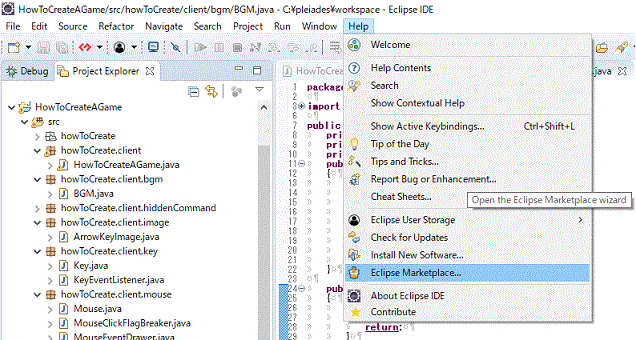
- Choose Eclipse Marketplace
Please choose help>Eclipse Market place.
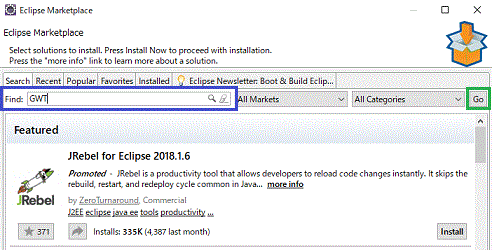
- Search GWT at Eclipse Marketplace
Please input GWT in search box at the blue box.Then, please click "Go" at the green box.
- Install GWT Eclipse plugin
Please click "install" at the blue box.If you haven't installed GWT, "install" is displayed although "installed" is displayed in the below photo. Then, please choose what you want to install and install.
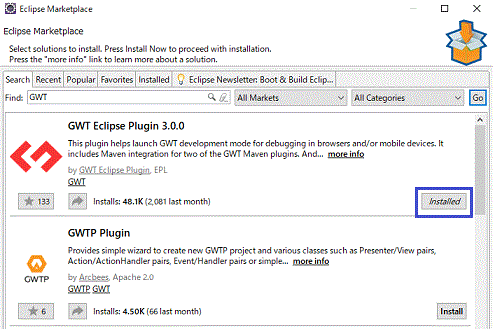
I installed GWT to Eclipse 4.8(Photon). I couldn't install both SDK2.7.0 and SDK 2.8.1. Finally, I installed only SDK 2.8.1.

How to create GWT Application project
I'll explain how to create GWT Application project.
- Expose the windonw to create new GWT Application project
We can expose the window to create new GWT Application project by the two ways. I'll show the first way.
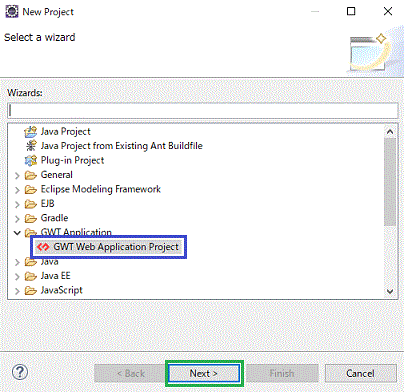
Please choose File>New>Project.
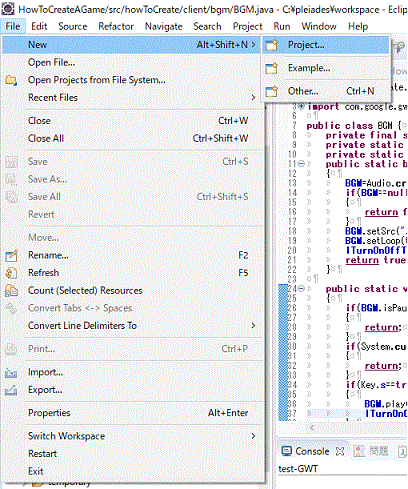
Please click "GWT Web Application Project" at the blue box. Then, please click "Next" at the green box.
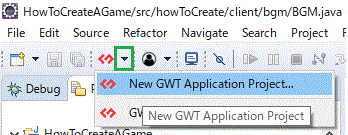
I'll show the second way.
Please click the black triangle at green box to choose "New GWT Application Project".
- Create New GWT Application Project
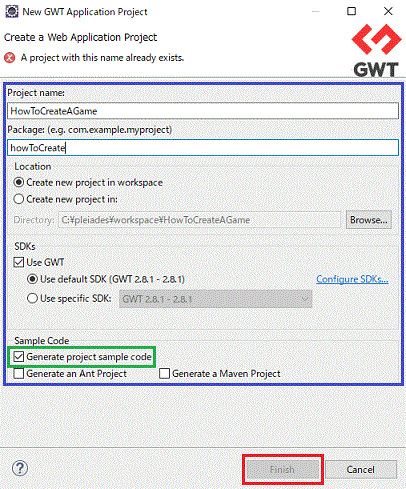
You should see the window to create new GWT Application project. Please write or choose the items at blue box. Maybe, you can use any package name. Please choose "Generate project sample code". Finally, please click "Finish".
How to adjust new GWT application project
I'll explain how to adjust new GWT application project.
You should have a new GWT Application project like the below.
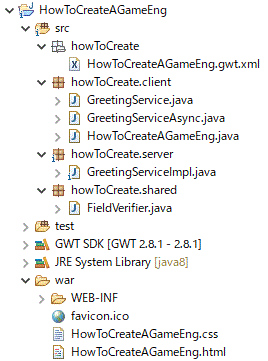
If no process don't need to be executed at a server, we need only client package. We don't need howToCreate.server、howToCreate.shared. You can delete sample programs if you don't need them. They are GreetingService.java and GreetingServiceAsync.java in howToCreate.client at the above photo. When you delete them, GWT Application project should become like the below photo.
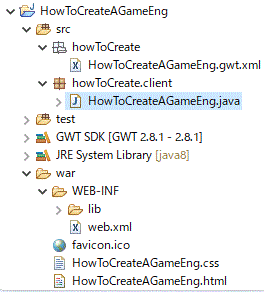
When you delete them, you should edit some files. I'll explain it in the below.
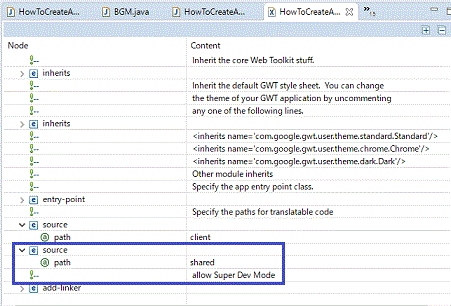
- edit gwt.xml
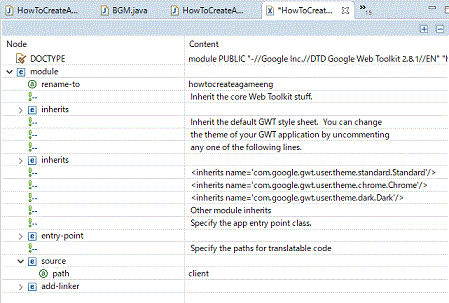
howToCreate.HowToCreateAGameEng.gwt.xml should be edited in this sample case. The configurations in the blue box should be deleted.
Before
After
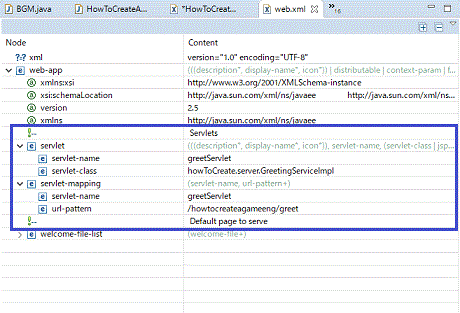
- edit web.xml
war.WEB-INF.lib.web.xml should be edited in this sample case. The configurations in the blue box should be deleted.
Before
After
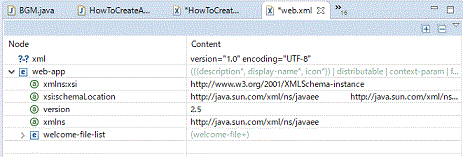
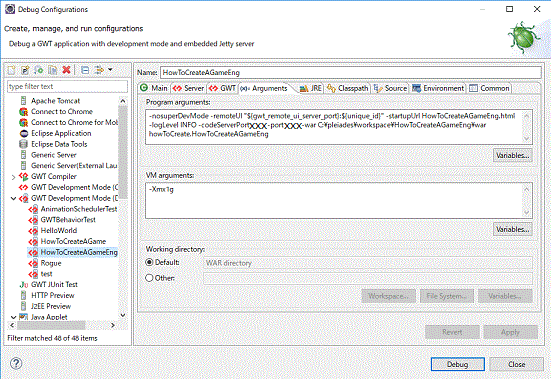
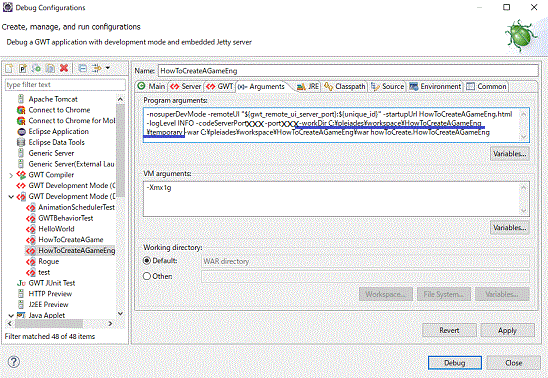
When you compile GWT Application project by development mode, cache files are stored to temp folder. They are stored to the same folder as usual if you configure nothing. They sometimes prevents a html page from reflecting change. In this case, you will want to delete cache files. So, you should configure the folder to store cache files. Please change GWT development mode configuretion at debug configurations. If you have never executed any project with GWT development mode, you won't be able to configure it. In this case, please execute a project with GWT development mode.
Before configuration
After configuration
You can begin to create GWT Application after this.
The function like main function of GWT Application
"public void onModuleLoad()" in howToCreate.client.HowToCreateAGame.java is the function like main function in my sample application. You can refer sample programs because it is created automatically in sample programs.
public class HowToCreateAGame implements EntryPoint,AnimationCallback {
private AnimationHandle handler;
public void onModuleLoad()
{
init();
if(bInitHasFailed==true)
{
return;
}
execute(0);
// executeByTimer();
}
@Override
public void execute(double timestamp)
{
handler=AnimationScheduler.get().requestAnimationFrame(this);
run();
}
private void executeByTimer()
{
final Timer timer = new Timer()
{
@Override
public void run()
{
loopProcess();
}
};
timer.scheduleRepeating(1);
}
}
In "onModuleLoad()", initialization, init() is executed first. Then, main process, "execute(timestamp)" is executed. "execute(timestamp)" is repeated infinitely. AnimationScheduler is used in "execute(timestamp)". On the other hands, Timer is used in "executedByTimer()". "executedByTimer()" is the same process as "execute(timestamp)". However, AnimationScheduler is prefered to Timer considering performance. Don't forget "implements AnimationCallback" when you use AnimationScheduler. I don't know how to use timestamp, which is the argument of "execute(timestamp)". It works well even if the value is anything.
You can know what is done in "init()" and "loopProcess()" at the end of this page.
How to use Canvas
I'll explain how to use Canvas. We can use Canvas to draw 2D shapes, images and strings. You may use it for game graphics.
I'll show you how to initialize Canvas in the below. Canvas is initialized at prepareCanvas() in my sample program.
public class HowToCreateAGame implements EntryPoint,AnimationCallback {
Canvas canvas;
Context2d context;
public static final int canvasHeight = 300;
public static final int canvasWidth = 300;
static final String divTagId = "canvasExample"; // must match div tag in html file
private void init()
{
prepareCanvas();
}
private void prepareCanvas()
{
canvas = Canvas.createIfSupported();
if (canvas == null)
{
RootPanel.get().add(new Label("Sorry, your browser doesn't support the HTML5 Canvas element"));
bInitHasFailed=true;
return;
}
canvas.setStyleName("canvasExample");
canvas.setWidth(canvasWidth + "px");
canvas.setCoordinateSpaceWidth(canvasWidth);
canvas.setHeight(canvasHeight + "px");
canvas.setCoordinateSpaceHeight(canvasHeight);
context = canvas.getContext2d();
KeyEventListener=new KeyEventListener();
MouseEventListener=new MouseEventListener();
canvas.addKeyDownHandler(KeyEventListener);
canvas.addKeyUpHandler(KeyEventListener);
canvas.addClickHandler(MouseEventListener);
canvas.addDoubleClickHandler(MouseEventListener);
canvas.setFocus(true);
RootPanel.get( divTagId ).add(canvas);
}
}
There are four notes.
First, you should call not constructor, but the function "createIfSupported" to create "Canvas". When "Canvas" can't be instanced, "createIfSupported" returns null. You should prepare for null case.
Secondly, you should configure ID for div tag. For example, string variable "divTagID" is configured to "canvasExample" and RootPanel.get( divTagId ).add(canvas) should be called. If you add a div tag with the ID in html file, you can display canvas on the html page. You can change css file to put canvas wherever you like.
html file for sample code
.gif)
html file for my sample
.gif)
css file for sample code
.gif)
css file for my sample
.gif)
You should write contents in html files. You should write appearance settings in css file. For exmaple, you should use css file to markup a text as bold or arange canvas to center. Roughly speaking, you should write what you can express in notepad of windows in html files.
Thirdly, I'll explain how to know key input or click. You should set the class implementing XXXHandler interface to the argument like canvas.addXXXHandler(argument). For example, KeyEventListener is defined like the below in my sample.
public class KeyEventListener implements KeyUpHandler,KeyDownHandler{
@Override
public void onKeyDown(KeyDownEvent event)
{
event.preventDefault();
switch(event.getNativeKeyCode())
{
case KeyCodes.KEY_LEFT: Key.left=true; break;
case KeyCodes.KEY_RIGHT: Key.right=true; break;
case KeyCodes.KEY_UP: Key.up=true; break;
case KeyCodes.KEY_DOWN: Key.down=true; break;
case KeyCodes.KEY_S: Key.s=true; break;
}
}
@Override
public void onKeyUp(KeyUpEvent event)
{
event.preventDefault();
switch(event.getNativeKeyCode())
{
case KeyCodes.KEY_LEFT: Key.left=false; break;
case KeyCodes.KEY_RIGHT: Key.right=false; break;
case KeyCodes.KEY_UP: Key.up=false; break;
case KeyCodes.KEY_DOWN: Key.down=false; break;
case KeyCodes.KEY_S: Key.s=false; break;
}
}
}
Key.left, Key.right and so on is defined as boolean variable in class "Key". It is public and static. For example, Key.left gets true if left arrow key is pushed. Key.left gets false if left arrow key isn't pushed.
event.preventDefault() let browsers ignore events. Therefore, this page doesn't scroll when you push arrow keys in this sample case.
Fourthly, you should get context2d of canvas. If you don't have this, you can't draw 2D shapes and strings on canvas. For expample, you prepare context as Context2d and write "context = canvas.getContext2d()" in your program.
How to draw on canvas
I'll explain how to draw on canvas.
You can configure color to fill 2D shapes by "context.setFillStyle". You can configure a string's color by it, too. For example, context.setFillStyle(CssColor.make("rgba(255,0,0,1)") makes 2D shapes red. You can configure color of lines by "context.setStrokeStyle". For example, context.setStrokeStyle(CssColor.make("rgba(255,0,0,1)") makes lines red. RGB and alpha value are given to CssColor.make as the argument. So, you should write "CssColor.make("rgba(value for red,value for green,value for blue,alpha value)")". You should configure alpha value between 0 and 1. 0 means that shapes are perfectly transparent. 1 means that shapes are perfectly opacue. I configured alpha value of the blue triangle to 0.5 in my sample.
You can configure line width by "context.set". You should give the line width for "context.set" as the argument.
- How to draw a line
The below is an example.
context.setStrokeStyle(Color);
context.beginPath();
context.moveTo(dx1, dy1);
context.lineTo(dx2, dy2);
context.closePath();
context.Stroke();
"context.moveTo(x1,y1)" configure start point to the coordinate (x1、y1). "context.lineTo(x2,y2)" configure end point to the coordinate (x2,y2). The line is actually drawn by "context.Stroke()".
Don't forget "context.beginPath()" before configuring a line and "context.closePath() after configuring it.
- How to draw a polygon
If you want to draw a filled polygon, you should write like the below.
context.setFillStyle(Color);
context.beginPath();
if(dVertexX.length!=dVertexY.length)
{
return;
}
context.moveTo(dVertexX[0], dVertexY[0]);
for(int i=1;i<dVertexX.length;i++)
{
context.lineTo(dVertexX[i], dVertexY[i]);
}
context.closePath();
context.fill();
If you want to draw an unfilled polygon, you should write like the below.
context.setStrokeStyle(Color);
context.beginPath();
if(dVertexX.length!=dVertexY.length)
{
return;
}
context.moveTo(dVertexX[0], dVertexY[0]);
for(int i=1;i<dVertexX.length;i++)
{
context.lineTo(dVertexX[i], dVertexY[i]);
}
context.closePath();
context.Stroke();
You can draw a polygon by the way to draw a line.
"dVertexX" and "dVertexY" are the coordinate of its vertices.
- How to draw a rectangle
If you want to draw an unfilled rectangle, you should write like the below.
context.setStrokeStyle(CssColor.make("rgba(255,0,0,1)"));
context.strokeRect(10, 10, 100, 40);
If you want to draw a filled rectangle, you should write like the below.
context.setFillStyle(CssColor.make("rgba(255,0,0,1)"));
context.fillRect(10, 10, 100, 40);
You can draw a rectangle by "context.strokeRect(x,y,width,height)" or "context.fillRect(x,y,width,height)". "x" and "y" are the coordinate of upper-left corner of a rectangle. "width" is its width. "height" is its height.
- How to draw arc and circle
We can draw arc or circle by "context.arc(x,y,radius,startAngle,endAngle)". "x" and "y" are the coordinate of the circle's center. "radius" is its radius. We can configure the drawn angle range of circle by "startAngle" and "endAngle". If the difference between "startAngle" and "endAngle" is more than 2*PI, a circle is drawn.
If you want to draw an unfilled arc, you should write like the below.
context.setStrokeStyle(CssColor.make("rgba(255,0,0,1)"));
context.beginPath();
context.arc(190, 75, 25, Math.PI/4, Math.PI*3/4);
context.closePath();
context.stroke();
If you want to draw a filled arc, you should write like the below.
context.setFillStyle(CssColor.make("rgba(0,0,255,1)"));
context.beginPath();
context.arc(190, 75, 25, Math.PI/4, Math.PI*3/4);
context.closePath();
context.fill();
You can use fifth argument of "context.arc" to configure the rotation direction to clockwise or anticlockwise. For example, you can configure it to clockwise when you write like "context.arc(190, 75, 25, Math.PI/4, Math.PI*3/4)" or "context.arc(190, 75, 25, Math.PI/4, Math.PI*3/4,false)". You can configure it to anticlockwise when you write like "context.arc(190, 75, 25, Math.PI/4, Math.PI*3/4,true)". If you configure the fifth argument to false, the positive direction of angle gets clockwise. If you configure the fifth argument to true, the positive direction of angle gets anticlockwise.
- How to draw a string
The below is an example to draw a string.
context.setFillStyle(CssColor.make("rgba(0,0,0,1)"));
context.setFont("bold 12pt 'Arial'");
context.fillText("draw string test", 10, 20);
You can configure a string's font by "context.setFont". You can draw a string "context.fillText(str,x,y)". "str" is a string to draw. "x" and "y" are the coordinate to draw.
You can get the width of a string. The below is an example.
TextMetrics TM
double dLength
context.setFont("bold 12pt 'Arial'");
TM=context.measureText("draw string test");
dLength=TM.getWidth();
You can get the width of a string by "TM.getWidth()".
- How to draw an image
I'll explain how to load an image. The below is an example to load "/war/img/test.png". You can use relative path from a html file with java script created by GWT. You can use absolute path from the current directory. Maybe, it is the top of you homepage. I think relative path is preferred to absolute path.
Image test;
test=new Image("./img/test.png");
You can use three functions to draw a image at a rectangle range.
context.drawImage(ImageElement.as(test.getElement()),dx,dy)
context.drawImage(ImageElement.as(test.getElement()),dx,dy,dw,dh)
context.drawImage(ImageElement.as(test.getElement()),sx,sy,sw,sh,dx,dy,dw,dh)
"dx" and "dy" are the coordinate to put the upper-left corner of a image. "dw" is the width to draw it. "dh" is the height to draw it.
You can configure "sx", "sy", "sw", "sh" to extract a part of a image from a rectangle range. "sx" and "sy" are the coordinate of its upper-left corner. "sw" is its width. "sh" is its height.
How to opearate an audio file
I'll explain how to operate an audio file.
I'll explain how to load an audio file. The below is an example to load "war/sound/test.mp3". I think relative path is preferred to absolute path.
public void load()
{
Audio Test;
Test=Audio.createIfSupported();
if(Test==null)
{
return false;
}
Test.setSrc("./sound/test.mp3");
}
You should call not constructor, but the function "createIfSupported" to create "Audio". When "AUdio" can't be instanced, "createIfSupported" returns null. You should prepare for null case. You can choose an audio file to operate by "setSrc".
I'll introduce some functions which will be often used.
- the function to play an audio file
Test.play() - the function to pause an audio file
Test.pause() - the functon to configure time to begin to play an audio file
Test.setCurrentTime(time)
"time" is time to begin to play an audio file. It is the double type variable. - the function to confirm if an audio file is paused or not
Test.isPaused()
It returns true if an audio file is paused. It returns false if an audio file is played.
How to debug a GWT Application project
I'll explain how to debug.
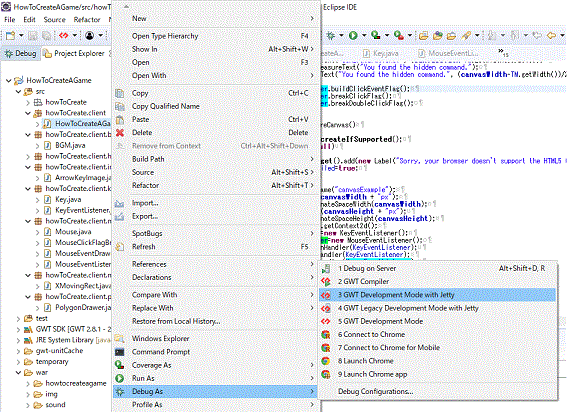
- Right-click on a file of the project you want to debug and click GWT Development mode with Jetty.
- Open the html file
If you wait a moment, URL is displayed in "Development mode" tab. Please double-click on it. You can right-click for more options.

- Debug the GWT Application project
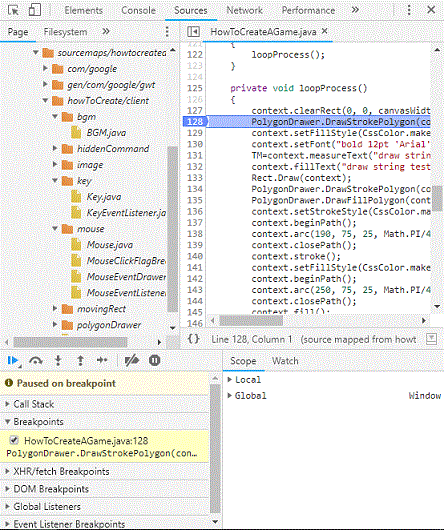
Press F12 to debug the GWT Application project after HTML file is opened. I could configure breakpoint at java programs in my environment(Chromium).
- Finish debugging the GWT Application project
Please click on the button at the blue box in the below photo to finish GWT development mode with Jetty if you want to finish debugging the GWT Application project. You can close the html file.

It will be the best to use chrome to debug the GWT Application project. If you want to do, you should download Chrome and append the path to chrome.exe (Ex.-Dchrome.location=C:/Program Files/xxxx/chrome.exe) to eclipse.ini.
Create Java Script to upload to a server
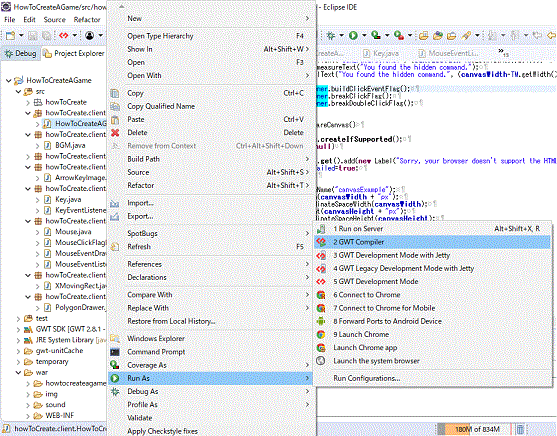
If you have created the GWT Application project, you should create Java Script to upload to a server. Please right-click on a file of the project and click on "GWT Compiler" like the below photo.
Upload the folders and files to a server
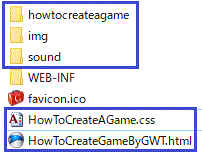
The folders and files to upload to a server is surrounded by a blue box in the below photo. In my sample, those are the folder "howtocreateagame" with Java Script files, the folder "img", the folder "sound" , HowToCreateAGame.css and HowToCreateAGame.html in the folder "war". You can edit css file and html file properly.
other knowledge
I'll explain the remains I have known.
- test folder
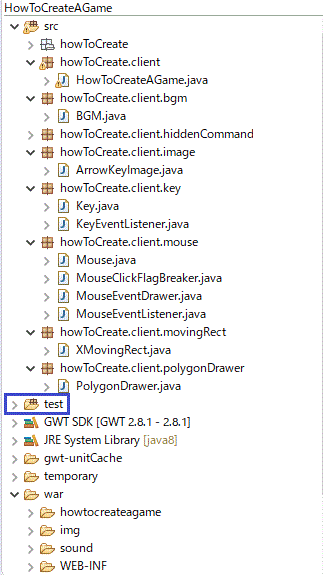
It is the source folder to use for Junit test. Junit test is the unit testing in Java.
- ArrayIndexOutOfBoundsException doesn't occur
Being Executed as Java Script may have some influence with on this.
- Random number
We can't use java.util.Random. However, we can use Math.Random.
- Compounding GWT and AWT
We can't use the classes in package "awt" for GWT Application projects. For example, Applet, Graphics, Point, Rectangle and so on. However, we can let them ignore with the anotation "@GWTIncompatible(value="xxx")" when the programs are compiled as GWT Application project. "xxx" is configured to "METHOD" to ignore a method. "xxx" is configured to "FIELD" to ignore a field variable. "xxx" is configured to "CLASS" to ignore a class. If you use it, you can write the programs for both applet and GWT.
The programs of my sample
I'll show the programs of my sample. You can copy and use this programs to create GWT Application projects. However, I don't accept any responsibilities whatever happens.
howToCreate.client.HowToCreateAGame.java
package howToCreate.client;
import com.google.gwt.animation.client.AnimationScheduler;
import com.google.gwt.animation.client.AnimationScheduler.AnimationCallback;
import com.google.gwt.animation.client.AnimationScheduler.AnimationHandle;
import com.google.gwt.canvas.client.Canvas;
import com.google.gwt.canvas.dom.client.Context2d;
import com.google.gwt.canvas.dom.client.CssColor;
import com.google.gwt.canvas.dom.client.TextMetrics;
import com.google.gwt.core.client.EntryPoint;
import com.google.gwt.user.client.Timer;
import com.google.gwt.user.client.ui.Label;
import com.google.gwt.user.client.ui.RootPanel;
import howToCreate.client.bgm.BGM;
import howToCreate.client.hiddenCommand.HiddenCommand;
import howToCreate.client.image.ArrowKeyImage;
import howToCreate.client.key.KeyEventListener;
import howToCreate.client.mouse.MouseEventDrawer;
import howToCreate.client.mouse.MouseEventListener;
import howToCreate.client.movingRect.XMovingRect;
import howToCreate.client.polygonDrawer.PolygonDrawer;
/**
* Entry point classes define <code>onModuleLoad()</code>.
*/
public class HowToCreateAGame implements EntryPoint,AnimationCallback {
Canvas canvas;
Context2d context;
public static final int canvasHeight = 300;
public static final int canvasWidth = 300;
static final String divTagId = "canvasExample"; // must match div tag in html file
private AnimationHandle handler;
private KeyEventListener KeyEventListener;
private MouseEventListener MouseEventListener;
private boolean bInitHasFailed;
private boolean bSupportAudio;
private XMovingRect Rect;
private double[] dStrokeTriangleVertexX;
private double[] dStrokeTriangleVertexY;
private double[] dFillTriangleVertexX;
private double[] dFillTriangleVertexY;
private double[] dStrokeLinePointX;
private double[] dStrokeLinePointY;
private double[] dFillLinePointX;
private double[] dFillLinePointY;
private TextMetrics TM;
private HiddenCommand hiddenCommand;
public void onModuleLoad()
{
init();
if(bInitHasFailed==true)
{
return;
}
execute(0);
// executeByTimer();
}
private void init()
{
prepareCanvas();
bSupportAudio=BGM.loadAudio();
ArrowKeyImage.loadImage();
Rect=new XMovingRect(30.0,100.0,10.0,CssColor.make("rgba(0,255,0,1"));
hiddenCommand=new HiddenCommand();
dStrokeTriangleVertexX=new double[3];
dStrokeTriangleVertexY=new double[3];
dFillTriangleVertexX=new double[3];
dFillTriangleVertexY=new double[3];
dStrokeLinePointX=new double[2];
dStrokeLinePointY=new double[2];
dFillLinePointX=new double[2];
dFillLinePointY=new double[2];
dStrokeTriangleVertexX[0]=22.5;
dStrokeTriangleVertexX[1]=85;
dStrokeTriangleVertexX[2]=53.75;
dStrokeTriangleVertexY[0]=50;
dStrokeTriangleVertexY[1]=50;
dStrokeTriangleVertexY[2]=100;
dFillTriangleVertexX[0]=dStrokeTriangleVertexX[0]+(dStrokeTriangleVertexX[1]-dStrokeTriangleVertexX[0])/2+10.0;
dFillTriangleVertexX[1]=dStrokeTriangleVertexX[1]+(dStrokeTriangleVertexX[1]-dStrokeTriangleVertexX[0])/2+10.0;
dFillTriangleVertexX[2]=dStrokeTriangleVertexX[2]+(dStrokeTriangleVertexX[1]-dStrokeTriangleVertexX[0])/2+10.0;
dFillTriangleVertexY[0]=100;
dFillTriangleVertexY[1]=100;
dFillTriangleVertexY[2]=50;
dStrokeLinePointX[0]=10;
dStrokeLinePointX[1]=30;
dStrokeLinePointY[0]=20;
dStrokeLinePointY[1]=20;
dFillLinePointX[0]=10;
dFillLinePointX[1]=30;
dFillLinePointY[0]=40;
dFillLinePointY[1]=40;
}
@Override
public void execute(double timestamp)
{
handler=AnimationScheduler.get().requestAnimationFrame(this);
run();
}
private void executeByTimer()
{
final Timer timer = new Timer()
{
@Override
public void run()
{
loopProcess();
}
};
timer.scheduleRepeating(1);
}
private void run()
{
loopProcess();
}
private void loopProcess()
{
context.clearRect(0, 0, canvasWidth, canvasHeight);
PolygonDrawer.DrawStrokePolygon(context, dStrokeLinePointX, dStrokeLinePointY, CssColor.make("rgba(255,0,0,1)"));
context.setFillStyle(CssColor.make("rgba(0,0,0,1)"));
context.setFont("bold 12pt 'Arial'");
TM=context.measureText("draw string test");
context.fillText("draw string test", (canvasWidth-TM.getWidth())/2, 20);
Rect.Draw(context);
PolygonDrawer.DrawStrokePolygon(context, dStrokeTriangleVertexX, dStrokeTriangleVertexY, CssColor.make("rgba(255,0,0,1)"));
PolygonDrawer.DrawFillPolygon(context, dFillTriangleVertexX, dFillTriangleVertexY, CssColor.make("rgba(0,0,255,0.5)"));
context.setStrokeStyle(CssColor.make("rgba(255,0,0,1)"));
context.beginPath();
context.arc(190, 75, 25, Math.PI/4, Math.PI*3/4);
context.closePath();
context.stroke();
context.setFillStyle(CssColor.make("rgba(0,0,255,1)"));
context.beginPath();
context.arc(250, 75, 25, Math.PI/4, Math.PI*3/4,true);
context.closePath();
context.fill();
context.setFillStyle(CssColor.make("rgba(0,0,0,1)"));
context.setFont("bold 10pt 'Arial'");
if(bSupportAudio==true&&BGM.isPaused()==true)
{
TM=context.measureText("Press s button to turn on the BGM.");
context.fillText("Press s button to turn on the BGM.", (canvasWidth-TM.getWidth())/2, 120);
}
else if(bSupportAudio==true)
{
TM=context.measureText("Press s button to turn off the BGM.");
context.fillText("Press s button to turn off the BGM.", (canvasWidth-TM.getWidth())/2,120);
}
BGM.play();
BGM.pause();
ArrowKeyImage.DrawKeys(context, 10.0, canvasHeight-70.0);
MouseEventDrawer.Draw(context, 110, canvasHeight-70.0);
hiddenCommand.DrawCorrectlyPushedCommand(context);
hiddenCommand.Judge();
if(hiddenCommand.hasInputHiddenCommand()==true)
{
context.setFillStyle(CssColor.make("rgba(0,0,0,1)"));
context.setFont("bold 14pt 'Arial'");
TM=context.measureText("Congraturations!");
context.fillText("Congraturations!", (canvasWidth-TM.getWidth())/2,150);
TM=context.measureText("You found the hidden command.");
context.fillText("You found the hidden command.", (canvasWidth-TM.getWidth())/2,170);
}
MouseEventListener.buildClickEventFlag();
MouseEventListener.breakClickFlag();
MouseEventListener.breakDoubleClickFlag();
}
private void prepareCanvas()
{
canvas = Canvas.createIfSupported();
if (canvas == null)
{
RootPanel.get().add(new Label("Sorry, your browser doesn't support the HTML5 Canvas element"));
bInitHasFailed=true;
return;
}
canvas.setStyleName("canvasExample");
canvas.setWidth(canvasWidth + "px");
canvas.setCoordinateSpaceWidth(canvasWidth);
canvas.setHeight(canvasHeight + "px");
canvas.setCoordinateSpaceHeight(canvasHeight);
context = canvas.getContext2d();
KeyEventListener=new KeyEventListener();
MouseEventListener=new MouseEventListener();
canvas.addKeyDownHandler(KeyEventListener);
canvas.addKeyUpHandler(KeyEventListener);
canvas.addClickHandler(MouseEventListener);
canvas.addDoubleClickHandler(MouseEventListener);
canvas.setFocus(true);
RootPanel.get( divTagId ).add(canvas);
}
}
howToCreate.client.bgm.BGM.java
package howToCreate.client.bgm;
import com.google.gwt.media.client.Audio;
import howToCreate.client.key.Key;
public class BGM {
private final static long lOnOffInterval=200;
private static Audio BGM;
private static long lTurnOnOffTime;
public static boolean loadAudio()
{
BGM=Audio.createIfSupported();
if(BGM==null)
{
return false;
}
BGM.setSrc("./sound/pastelHouse.mp3");
BGM.setLoop(true);
lTurnOnOffTime=-1-lOnOffInterval;
return true;
}
public static void play()
{
if(BGM.isPaused()==false)
{
return;
}
if(System.currentTimeMillis()<=lTurnOnOffTime+lOnOffInterval)
{
return;
}
if(Key.s==true)
{
BGM.play();
lTurnOnOffTime=System.currentTimeMillis();
}
}
public static void pause()
{
if(BGM.isPaused()==true)
{
return;
}
if(System.currentTimeMillis()<=lTurnOnOffTime+lOnOffInterval)
{
return;
}
if(Key.s==true)
{
BGM.pause();
BGM.setCurrentTime(0.0);
lTurnOnOffTime=System.currentTimeMillis();
}
}
public static boolean isPaused()
{
return BGM.isPaused();
}
}
howToCrate.client.image.ArrowKeyImage.java
package howToCreate.client.image;
import com.google.gwt.canvas.dom.client.Context2d;
import com.google.gwt.dom.client.ImageElement;
import com.google.gwt.user.client.ui.Image;
import howToCreate.client.key.Key;
public class ArrowKeyImage {
private static Image ArrowKeyImage;
public static void loadImage()
{
ArrowKeyImage=new Image("./img/ArrowKey.png");
}
public static void DrawKeys(Context2d context,double dDrawnX,double dDrawnY)
{
if(Key.up==true)
{
drawUpKey(context,dDrawnX+30.0,dDrawnY);
}
if(Key.left==true)
{
drawLeftKey(context,dDrawnX,dDrawnY+30.0);
}
if(Key.down==true)
{
drawDownKey(context,dDrawnX+30.0,dDrawnY+30.0);
}
if(Key.right==true)
{
drawRightKey(context,dDrawnX+60.0,dDrawnY+30.0);
}
}
public static void drawUpKey(Context2d context,double dDrawnX,double dDrawnY)
{
context.drawImage(ImageElement.as(ArrowKeyImage.getElement()), 30.0, 0.0, 30.0, 30.0, dDrawnX, dDrawnY, 30.0, 30.0);
}
public static void drawLeftKey(Context2d context,double dDrawnX,double dDrawnY)
{
context.drawImage(ImageElement.as(ArrowKeyImage.getElement()), 0.0, 30.0, 30.0, 30.0, dDrawnX, dDrawnY, 30.0, 30.0);
}
public static void drawDownKey(Context2d context,double dDrawnX,double dDrawnY)
{
context.drawImage(ImageElement.as(ArrowKeyImage.getElement()), 30.0, 30.0, 30.0, 30.0, dDrawnX, dDrawnY, 30.0, 30.0);
}
public static void drawRightKey(Context2d context,double dDrawnX,double dDrawnY)
{
context.drawImage(ImageElement.as(ArrowKeyImage.getElement()), 60.0, 30.0, 30.0, 30.0, dDrawnX, dDrawnY, 30.0, 30.0);
}
}
howToCreate.client.key.Key.java
package howToCreate.client.key;
public class Key
{
static public boolean left,right,up,down,s;
}
howToCreate.client.key.KeyEventListener.java
package howToCreate.client.key;
import com.google.gwt.event.dom.client.KeyCodes;
import com.google.gwt.event.dom.client.KeyDownEvent;
import com.google.gwt.event.dom.client.KeyDownHandler;
import com.google.gwt.event.dom.client.KeyUpEvent;
import com.google.gwt.event.dom.client.KeyUpHandler;
public class KeyEventListener implements KeyUpHandler,KeyDownHandler{
@Override
public void onKeyDown(KeyDownEvent event)
{
event.preventDefault();
switch(event.getNativeKeyCode())
{
case KeyCodes.KEY_LEFT: Key.left=true; break;
case KeyCodes.KEY_RIGHT: Key.right=true; break;
case KeyCodes.KEY_UP: Key.up=true; break;
case KeyCodes.KEY_DOWN: Key.down=true; break;
case KeyCodes.KEY_S: Key.s=true; break;
}
}
@Override
public void onKeyUp(KeyUpEvent event)
{
event.preventDefault();
switch(event.getNativeKeyCode())
{
case KeyCodes.KEY_LEFT: Key.left=false; break;
case KeyCodes.KEY_RIGHT: Key.right=false; break;
case KeyCodes.KEY_UP: Key.up=false; break;
case KeyCodes.KEY_DOWN: Key.down=false; break;
case KeyCodes.KEY_S: Key.s=false; break;
}
}
}
howToCreate.client.mouse.Mouse.java
package howToCreate.client.mouse;
public class Mouse {
static public boolean click,doubleClick;
}
howToCreate.client.mouse.MouseClickFlagBreaker.java
package howToCreate.client.mouse;
public class MouseClickFlagBreaker {
private static long lInterval=500;
private long lClickedTime;
private long lDoubleClickedTime;
public void setClickedTime()
{
lClickedTime=System.currentTimeMillis();
}
public void setDoubleClickedTime()
{
lDoubleClickedTime=System.currentTimeMillis();
}
public void breakClickFlag()
{
if(Mouse.click==false)
{
return;
}
if(System.currentTimeMillis()>lClickedTime+lInterval)
{
Mouse.click=false;
}
}
public void breakDoubleClickFlag()
{
if(Mouse.doubleClick==false)
{
return;
}
if(System.currentTimeMillis()>lDoubleClickedTime+lInterval)
{
Mouse.doubleClick=false;
}
}
}
howToCreate.client.mouse.MouseEventDrawer.java
package howToCreate.client.mouse;
import com.google.gwt.canvas.dom.client.Context2d;
import com.google.gwt.canvas.dom.client.CssColor;
public class MouseEventDrawer {
public static void Draw(Context2d context,double dDrawnX,double dDrawnY)
{
if(Mouse.click==true)
{
context.setFillStyle(CssColor.make("rgba(237,201,0,1)"));
context.fillRect(dDrawnX, dDrawnY, 30, 60);
}
if(Mouse.doubleClick==true)
{
context.setFillStyle(CssColor.make("rgba(255,0,0,1)"));
context.fillRect(dDrawnX+30, dDrawnY, 30, 60);
}
}
}
howToCreate.client.mouse.MouseEventListener.java
package howToCreate.client.mouse;
import com.google.gwt.event.dom.client.ClickEvent;
import com.google.gwt.event.dom.client.ClickHandler;
import com.google.gwt.event.dom.client.DoubleClickEvent;
import com.google.gwt.event.dom.client.DoubleClickHandler;
public class MouseEventListener implements ClickHandler,DoubleClickHandler{
private static final int lFlagHoldTime=200;
private MouseClickFlagBreaker mouseClickFlagBreaker=new MouseClickFlagBreaker();
private long lClickEventTime;
private boolean bDoubleClickedFlag;
private boolean bClickedFlag;
@Override
public void onDoubleClick(DoubleClickEvent event)
{
bDoubleClickedFlag=true;
lClickEventTime=System.currentTimeMillis();
mouseClickFlagBreaker.setDoubleClickedTime();
}
@Override
public void onClick(ClickEvent event)
{
bClickedFlag=true;
lClickEventTime=System.currentTimeMillis();
mouseClickFlagBreaker.setClickedTime();
}
public void buildClickEventFlag()
{
if(System.currentTimeMillis()<=lClickEventTime+lFlagHoldTime)
{
return;
}
if(bDoubleClickedFlag==true)
{
Mouse.doubleClick=true;
bClickedFlag=false;
bDoubleClickedFlag=false;
return;
}
if(bClickedFlag==true)
{
Mouse.click=true;
bClickedFlag=false;
bDoubleClickedFlag=false;
}
}
public void breakDoubleClickFlag()
{
mouseClickFlagBreaker.breakDoubleClickFlag();
}
public void breakClickFlag()
{
mouseClickFlagBreaker.breakClickFlag();
}
}
howToCreate.client.movingRect.XMovingRect.java
package howToCreate.client.movingRect;
import com.google.gwt.canvas.dom.client.Context2d;
import com.google.gwt.canvas.dom.client.CssColor;
import howToCreate.client.HowToCreateAGame;
public class XMovingRect {
private static final long lMoveInterval=10;
private double x;
private double y;
private double width;
private double height;
private CssColor Color;
private long lMovedTime;
private int iMoveCounter;
public XMovingRect(double dDrawnY,double dWidth,double dHeight,CssColor Color)
{
y=dDrawnY;
width=dWidth;
height=dHeight;
this.Color=Color;
lMovedTime=-201;
iMoveCounter=0;
}
public void Draw(Context2d context)
{
if(System.currentTimeMillis()>lMovedTime+lMoveInterval)
{
lMovedTime=System.currentTimeMillis();
iMoveCounter++;
}
x=(HowToCreateAGame.canvasWidth-width)/2+(HowToCreateAGame.canvasWidth-width)/4*Math.sin(iMoveCounter*0.1);
context.setStrokeStyle(Color);
context.strokeRect(x, y, width, height);
}
}
howToCreate.client.polygonDrawer.PolygonDrawer.java
package howToCreate.client.polygonDrawer;
import com.google.gwt.canvas.dom.client.Context2d;
import com.google.gwt.canvas.dom.client.CssColor;
public class PolygonDrawer {
public static void DrawFillPolygon(Context2d context,double[] dVertexX,double[] dVertexY,CssColor Color)
{
context.setFillStyle(Color);
DrawPolygon(context,dVertexX,dVertexY);
context.fill();
}
public static void DrawStrokePolygon(Context2d context,double[] dVertexX,double[] dVertexY,CssColor Color)
{
context.setStrokeStyle(Color);
DrawPolygon(context, dVertexX, dVertexY);
context.stroke();
}
private static void DrawPolygon(Context2d context,double[] dVertexX,double[] dVertexY)
{
context.beginPath();
if(dVertexX.length!=dVertexY.length)
{
return;
}
context.moveTo(dVertexX[0], dVertexY[0]);
for(int i=1;i<dVertexX.length;i++)
{
context.lineTo(dVertexX[i], dVertexY[i]);
}
context.closePath();
}
}
